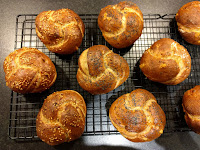
Tuesday 28 February 2017

Orange Scotch Pancakes

It's Pancake Day!

It's the one day of the year when I make pancakes. I normally do the traditional "crepe"-style pancakes, however to be honest I don't really like them. This year I dug out a recipe for some scotch pancakes instead...something I really like, but have never made (I affectionately knew them as pixie-pillows). These were remarkably easy to make, though not quite as orang'y as I hoped. The recipe made about 12 of what I would consider a decent pancake (the recipe claimed 24...they would be very small). I found you could do them in batches of 3 in a normal frying pan.

Orange Scotch Pancakes - Recipe

Ingredients

  • 2 Oranges
  • Approximate 100ml milk
  • 175 self-raising flour
  • 1tsp baking powder
  • 40g caster sugar
  • 1 egg
  • Sunflower oil 
  • Golden syrup (to serve)
1) Put the flour, sugar, baking powder and caster sugar in a bowl, and mix with a whisk

2) Zest the oranges into a bowl

3) Juice the oranges into a jug (I got approx 100ml of orange juice out of them)

4) Top the juice up to 200ml with milk

5) Put the egg and half the orange juice mixture into the flour, and mix until smooth

6) Slowly add the rest of the orange juice mixture until you have a thick, creamy batter

7) Pour a small amount of sunflower oil into a large frying pan, over a medium heat

8) Pour 2 tbsp of the batter into the frying pan (you should be able to fit 3 pancakes of this size into the pan)

9) Fry until bubbles appear and form on the upper side, then flip carefully (it will be quite quick...1-2 minutes per pancake)


10) Fry the other side for approximately 1 minute, then remove to a plate (you should be able to do 4 batches of 3)

11) Serve with golden syrup
Continue Reading...

Sunday 26 February 2017

Bacon, Broccoli, Tomato and Feta Quiche

Another laughable attempt to make something "healthy" for work. I was pretty pleased with the last goats cheese and broccoli quiche I did, so I thought I'd inflict in on the people at work. I've had made the executive decision that feta and goats cheese are the same thing!

I've had a bit of an issue recently where my shortcrust is cracking in the oven during the blind bake...It tried again this time, however I cunningly patched it with a small piece of goats cheese. I was able to reduce the amount of egg filling due to the extra filling in this one (the tomato). Otherwise it all went pretty well, and I have quiches down pretty pat by now.

Bacon, Broccoli, Tomato and Feta Quiche - Recipe

Shortcrust Pastry Recipe

Shortcrust Basic Recipe - I did this batch as a 300g flour mix, then blind-baked it with an egg wash to get a nice, sealed pastry case. While the pastry is blind-baking, you can prepare the filling

Filling Ingredients

  • 150g smoked bacon
  • 150g feta cheese
  • 2 tomatoes
  • 2 large mushrooms
  • 1 broccoli floret
  • 4 large eggs
  • 80g milk
  • 260g double cream
1) Thinly slice the bacon

2) Place in a frying pan over a medium/high heat and fry until browning, and any moisture has evaporated

3) Remove from the heat and leave to cool

4) Thinly slice the tomatoes

5) Thinly slice the mushrooms

6) Remove the large stalks form the broccoli, and trim down 9-10 small florets of broccoli

7) Slice the feta into small, thin chunks

8) Put the eggs, cream and milk into a large jug, and whisk together

Assembly

1) Pre-heat the oven to 160'C

2) Layer the feta across the bottom of the pastry case

3) Layer the mushroom and tomato slices over the feta

4) Sprinkle the bacon over the top

5) Spread the broccoli florets evenly over the pastry case

6) Fill the pastry case with the egg mixture

7) Carefully place the tin in the oven and bake for 30-35 minutes, until the egg mixture in the middle of the quiche has started to golden.

8) Remove to a wire rack to cool completely
Continue Reading...

Arangaluska - Attempt 2

I've come to the conclusion that my bundt tin is a bit too small for this recipe....it somewhat overflowed!

I did all the following changes from the first batch;
  1. Smaller balls of dough
  2. Added some walnut pieces into the tin
  3. Lower baking temperature
  4. Heavier zesting of oranges

These changes meant there were some other tweaks...I used more sugar when I was coating, and I had a slightly different method to do the coating as well...the balls were dunked in a bowl of melted butter, and then rolled around in a baking tray full of sugar. It was a messy process, but I got a decent coverage overall.

I think I should probably do about 20% less dough for my tin (or, get a bigger tin!). Alternately, I have an angel food cake tin which is MASSIVE, and I could probably make a fairly epic-size cake in that.

Arangaluska - Recipe

Dough Ingredients

  • 500g strong white flour
  • 100ml milk
  • 4 large eggs
  • 5g salt
  • 50g caster sugar
  • 10g fast-action yeast
  • 150g butter (softened)
  • Zest of 2 oranges
1) Place the flour, salt, sugar, zest and yeast in a stand mixer with the dough hook attachment

2) Put the eggs and milk in a jg, and beat together

3) Pour the egg mixture into the flour, and begin to mix using the stand mixer. Beat for 4-5 minutes until a dough has formed

4) Take the dough out and fold the butter into the dough

5) Return to the stand mixer and knead for another 10 minutes, until you have a smooth, glossy dough. It should be less sticky, and be cleaning the bowl.

6) Turn the dough out into a lightly oiled tub, cover with clingfilm, and leave to prove until at least tripled in size

Caramel and Filling Ingredients

  • 100g butter, melted and cooled slightly
  • 150g soft dark brown sugar (put it in a baking tray)
  • 100g walnut pieces

1) Brush the inside of a bundt tin with some melted butter

2) Turn the dough out onto a lightly oiled surface, and knock back.

3) Chop the dough into 50-60 pieces, and roughly roll each one into a ball using your hands

4) Dip each ball in the melted butter, then roll in sugar. You can do 5 or 6 at a time to speed things up.

5) Place the balls into the bundt tin, slowly building up.

6) As you build up, occasionally sprinkle walnut pieces in amongst the balls.

7) Cover the bowl, and leave to prove for an hour.

8) Pre-heat the oven to 160-170'C

9) Once proved, bake in the oven for 30-35 minutes, until the sugar has caramelised, and the dough is cooked

10) Turn out onto a wire rack, with a baking tray underneath

11) Pull off the tin, and leave to cool

Continue Reading...

Wednesday 22 February 2017

Carrot Cake

A day ill at home, with an annoying cold. I'm not actually ill that often, which is fortunate, as I don't really cope with it that well. The house is still a little bare of food since I came back, so I scanned the books to try and work out what I could make to take my mind off the bunged-up nose. I'm hoping to be back in the office tomorrow, so something that was viable as gluten-free would be preferable.
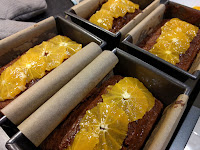
The limiting factor was actually butter, so I eventually settled on a carrot cake. I found a basic recipe that used walnuts...didn't have any of those around, so swapped them for sultanas. I also added mixed spice and cinnamon (as I believe all carrot cakes should have this), and some orange zest...partially as I always associate carrot cake with citrus, and partly as I suppose Vitamin C is good for the immune system.

I did two batches...one was gluten-free in a 20cm cake tin, and the other in a 2lb loaf tin (useful to know...basically the same volume it turns out!) using wholemeal self-raising flour. They both came out quite well, nice and moist, though as always I think that more spice and cinnamon would not go amiss (this might be partly as my taste buds are probably dead right now!) Loaf cakes are a really nice format for serving, as you can easily produce even slices...though they can never be considered that pretty I guess...

Carrot Cake - Recipe

  • Pre-heat oven to 160'C
  • Grease and line a 20cm deep cake tin OR a 2lb loaf tin

Ingredients

  • 150g muscavado sugar
  • 50g sultanas
  • 100g grated carrot
  • 2 large, ripe bananas
  • 2 large eggs
  • 150ml sunflower oil
  • 2tsp bicarbonate of soda 
  • Zest of 1 large orange
  • 1tsp mixed spice
  • 1tsp ground cinnamon

Gluten-Free

  • 215g plain, gluten-free flour
  • 2 tsp baking powder

Gluten

225g wholemeal self-raising flour

1) Place the carrot, sultanas, sugar, eggs, zest and sunflower oil in a stand mixer bowl with the paddle attachment

2) Mash the bananas with a fork, and add to the bowl

3) Mix together until smooth (ish)

4) Sieve the flour, spices, bicarbonate and (if doing gluten-free) baking powder together

5) Mix the flour with a whisk to make sure that it is evenly mixed

6) add the flour mix to the stand mixer, and mix until combined

7) Pour the mixture into the prepared tin

8) Bake in the oven for 45-55 minutes, until a skewer comes out clean

9) Remove to a wire rack to cool

Topping Ingredients

  • 175g cream cheese (I used light Philadelphia, other brands are available)
  • 100g icing sugar (sifted)
  • 50g softened butter
  • Vanilla essence
1) Place the butter, icing sugar, cheese and essence in a stand mixer bowl with the paddle attachment

Note - really make sure you soften the butter, or your topping will be lumpy, and you'll end up forcing it through a sieve

2) Mix hard until smooth

3) Transfer to a clean bowl, and leave to chill in the fridge

4) Once the cake is cooled, spread the topping generously over the cake.
Continue Reading...

Caramel and Orange Brioche / Monkey Bread / Arangaluska - Attempt 1

I took a day off when I got back from Spain, so had a bit of spare time to do a slow bake. I haven't done a brioche for a while, so thought I'd do something a bit experimental. A while back I had something called monkey bread, which was made of balls of brioche covered in a caramel. I decided to see if I could make up the recipe, using just stuff I had in the house.

The brioche was fairly easy. As a base I used my normal bread recipe, then swapped out the water for eggs and milk, and then added in a healthy dose of butter instead of oil. I added a little citrus flavour with orange zest, and then whipped up the dough using the trusty (and these days slightly noisy) stand mixer).

I wasn't entirely sure on how to do the caramel in this context...I ended up forming about 15 balls of brioche, then coated them in melted, cooled butter, then rolled them in brown sugar, before placing them in a buttered bundt tin. I don't think was quite right, as the drier sugar tended to burn slightly (or I had it too hot!), and also it was nowhere near enough balls of brioche, the caramel was not spread evenly enough throughout the loaf.

...so, I'll be doing this again (probably at the weekend, or next week), with the following changes;
1) More brioche balls (a bit of investigation suggests more than 50)
2) Add cinnamon to the sugar. Possibly also bits of nut (based on the traditional Hungarian recipe)
3) A lower temperature...I did it at 180-190'C, however I think 160'C may be wiser, with a sugar formation.

As part of the post-baking reading, I found that monkey bread is actually a Hungarian recipe called Aranygaluska, so I may call it that to make it sound posher!

Monkey Bread / Arangaluska - Recipe (Attempt 1)

Dough Ingredients

  • 500g strong white flour
  • 4 large eggs (room temperature)
  • 75-100ml milk
  • 150g softened butter
  • 10g yeast
  • 10g salt
  • Zest of 2 oranges 
1) Place the flour, salt, yeast, zest and milk in a stand mixer with the dough hook attached

2) Begin to mix, and add the eggs in one at a time

3) Mix for 5 minutes until a smooth dough is starting to form

4) remove the dough, and wrap it around the butter. Return it to the mixer (I find this tends to help get the butter mixed into the dough...if you add it into the bowl by itself it gets more smeared around the outside)

5) Mix for 5-10 minutes until a smooth, glossy dough is formed.

6) Place in a slightly oiled container, cover, and leave to prove until tripled in size (this is an enriched dough, so this can take some time. Resist the temptation to place it somewhere warm, as this may cause the butter to melt, which will impact your bake)

Caramel Ingredients

  • 100g butter (melted and cooled)
  • 100g soft brown sugar
Note - I think adding cinnamon and nut pieces here would improve things!

1) Take a bundt tin, and brush the inside with some of the melted butter to coat it

2) Grease a work surface (I rubbed some butter into it), tip the dough out and knock it back.

3) Split it into smaller balls (I did about 15, however I think you actually want way more...60-50 at least)

4) Roll each chunk into a small ball, then coat in melted butter and roll in the sugar

5) Place the balls in the bundt tin to fill it up

6) Cover the bundt tin and leave to prove until the dough reaches the top of the tin (at least an hour probably)

7) Pre-heat the oven to 160-180'C (I did 180'C, I would recommend going lower)

8) Place the bread into the oven for 30-35 minutes, until golden

9) Remove to a wire rack to cool slightly. Place a baking tray under the wire rack, as when you turn it out, there may be some caramel coming out

10) Flip the tin over and remove the bread from the tin.

11) (optional) Once cooled drizzle with some melted white chocolate to decorate.
Continue Reading...

A week in Spain

My yearly escape to the continent to avoid the tail end of the British winter, I was off in Spain last week, getting in some quality miles on my bike, and generally not being cold and wet. The training camp is run my my coach Tom Kirk from Custom Cycle Coaching, and it's a great way of transitioning from winter training to summer riding. This year (I've been out for the last 4 years now) we were also able to watch a stage of the Vuelta Andalucia, and got to watch the pro's smash it up a climb just outside of Granada.


In total I racked up just over 650km of riding, and over 13,000 metres of climbing. I'm now fairly shattered, but hoping for my energy levels to come back before the weekend, when the local reliability rides begin.

Only downside is that I've come down with a mild cold, with a bunged up nose and a sore throat. I'm throwing various drugs and chemicals don me to try and clear it as fast as possible!
Continue Reading...

Wednesday 8 February 2017

Carrot and Orange Loaf Cakes

More loaf cakes...they are a great format for large meetings at work, as you can quickly give a lot of people slices to go with their mid-morning coffee, when the brain is just starting to crave a hit of carbs to keep it going. The original recipe was for a single 1lb loaf cake, however I've gone for 2 x 1lb loaf tins, reducing the cooking time a little to compensate.

It's another classic flavour, and I very nearly threw in some sultanas, as it's crying out for it. Once again I've done a gluten-free batch, and it was notably different in cooking. The wet mixture was drier, and it's risen more evenly. The recipe I based this on had some humorous omissions...notably no mention of grating the carrot (I mean, I sort of assumed the carrot was grated, but maybe you're supposed to chuck the thing in whole?)

The only thing I'd change is to make the mixtures a little larger...perhaps 10-15% more on everything, to fully fill out the tins.

Carrot and Orange Loaf Cakes - Recipe

  • Grease and line 2 1lb loaf tins
  • Pre-heat the oven to 160'C

Ingredients

  • 1 orange
  • 150g butter - softened
  • 150g muscavado sugar
  • 2 eggs
  • 200g self-raising flour OR 190g gluten-free flour and 10g baking powder
  • 1tsp baking powder (yes, you need this as well with the gluten-free...carrot-cake is heavy)
  • 1tsp ground mixed spice
  • 1tbsp milk
  • 2 tbsp honey

1) Zest the orange, and place in a stand-mixer bowl with the paddle attachment

2) Add the sugar, eggs and butter to the stand mixer

3) Mix until as smooth as possible (the butter will clump a little, but get it as soft and smooth as possible)

4) Grate the carrot, and place in a large mixing bowl

5) Add the flour, baking powder and mixed spice to the carrot, and mix with a spatula. If it's very stiff, add a spalsh of milk (the gluten-free option may well need this)

6) Pour the wet mixture onto the carrot mixture, and stir using a spatula until smooth

7) Split the mixture between the 2 prepared tins, and level

8) Bake in the oven for 45 minutes

9) While the cakes are baking, cut the pith off the orange, and slice thinly

10) Take the cakes out of the oven, and decorate the top with the sliced orange

11) Drizzle the honey over the top, and spread around with a pastry brush

12) Return to the oven for 15 minutes

13) Remove to a wire rack to cool
Continue Reading...

Saturday 4 February 2017

Pain de Savoie - Miniatures - Attempt 3

Everyone loves a trier!

I've been putting a lot of thought into these, and decided to go outside the tin, and rather than do a loaf, do a bun. I was still keen to make it look fancy, so I went for a single knot roll (which is simpler than it looks). One issue I've had previously is cheese leakage (I clearly worry about serious items!). A traditional pain de savoie has layers, which cheese in-between, however this is not really viable for a knotted bun.

After some consideration, I decided to nix the layers, which moves a bit away from the original concept, but I think it maintains the flavours and textures. There were other changes I did as well;
  • Previously I've used lardons or pancetta, which was already in chunks. Going smaller meant these chunks were too large, so instead I used smoked bacon (180g of wet weight, or half a pack), which I chopped and fried, giving me smaller chunks, making it easier to shape.
  • I chopped the cheese (still comte) into small chunks (5-6mm cubes). Grating forms too much lamination,  while large chunks would be out of scale.
  • I went for 9 rolls, which meant each had ~100g of dough, and fitted well onto a single baking sheet. After some experimentation, about 15-18g of cheese per roll was about right.
Leakage was still an issue, though I think this was partially about how I formed the dough sausage. I took the dough, hand-rolled a sausage about 30-25cm in length, then flattened it with the palm of my hand. I then sprinkled the cheese down the middle, and tightly rolled the dough around this. I then (and I'm not sure why, it seemed a good process at the time) folded it in half and re-rolled it out to about 35-40cm, which gave me a decent length to form the knot. The folding caused seaming in the bread, which displayed during the baking. I also had some leakage, probably due to dough being too tin in areas.

What I will do next time is initially roll the dough to a shorter sausage, then add the cheese and roll back into a sausage...I'll then roll it out to 35-40cm (no folding over). Hopefully this should also limit thin spots for the cheese to break out!.

Having the bacon in there made the bread slightly saltier, so I shall reduce the amount of salt in the dough.

Finally came the decoration. As a general rule of thumb, I have 3 ways of dressing bread;
  • Black poppy seeds
  • White sesame seeds
  • water and flour
There is also egg washes, however I've tried this previously, and wasn't keen on the effect. This time I did 3 of each of the above decorations. I was happiest with the poppy seeds (which I think on balance is my favourite generally). Before they went in the oven, I brushed each with water, a couple of times, then stuck on the dressing. There was a small amount of water put in the oven (1 ramekin) to help a bit of crust form, however I didn't want too much.

Finally, the baking time was 20 minutes at 210'C, but I rotated them at 12 minutes to allow them to bake evenly.

I think I'm nearly there with these...hopefully one more batch and I'll have a final recipe
Continue Reading...